That constant drip from your kitchen or bathroom faucet is more than just annoying. A single leaky faucet dripping once per second wastes more than 3,000 gallons of water per year, which shows up fast on your water bill. The good news is that most faucet leaks come down to a worn washer or a tired O-ring, and you can fix either one in under an hour with basic tools you probably already own. This guide walks you through everything: what to grab before you start, how to take the faucet apart, what to watch out for, and how to know when the job is done right.
Table of Contents
- What you need before you start
- Step-by-step: Fixing your leaky faucet
- Troubleshooting and common mistakes
- Testing your repair and knowing when to call for help
- The real DIY truth: Why most leaks are easier to fix than you think
- Need a hand? Middle Georgia's trusted handyman is here
- Frequently asked questions
Key Takeaways
| Point | Details |
|---|---|
| DIY faucet repair is doable | Most homeowners can fix a leaky faucet with basic tools and patience. |
| Check all seals and washers | Damaged washers, O-rings, or valve seats are typically the culprit. |
| Preparation is key | Having the right supplies and turning off the water prevents bigger problems. |
| Test your work | Always check for leaks after reassembly to confirm the faucet is fixed. |
What you need before you start
Now that you understand why fixing a leaky faucet matters, let's make sure you're prepared to get the job done. Jumping into a repair without the right parts on hand is the fastest way to end up with a disassembled faucet and no way to finish the job. A quick trip to your local hardware store before you touch a single screw saves you a lot of frustration.
Here's what you'll need for most standard faucet repairs:
- Adjustable wrench for loosening and tightening packing nuts
- Phillips head screwdriver for handle screws
- Flathead screwdriver for prying off decorative caps
- Needle-nose pliers for gripping small parts in tight spaces
- Replacement washers in multiple sizes (grab a variety pack)
- O-rings that match your faucet stem diameter
- Plumber's grease to lubricate new seals before installation
- A small bucket or towel to catch residual water
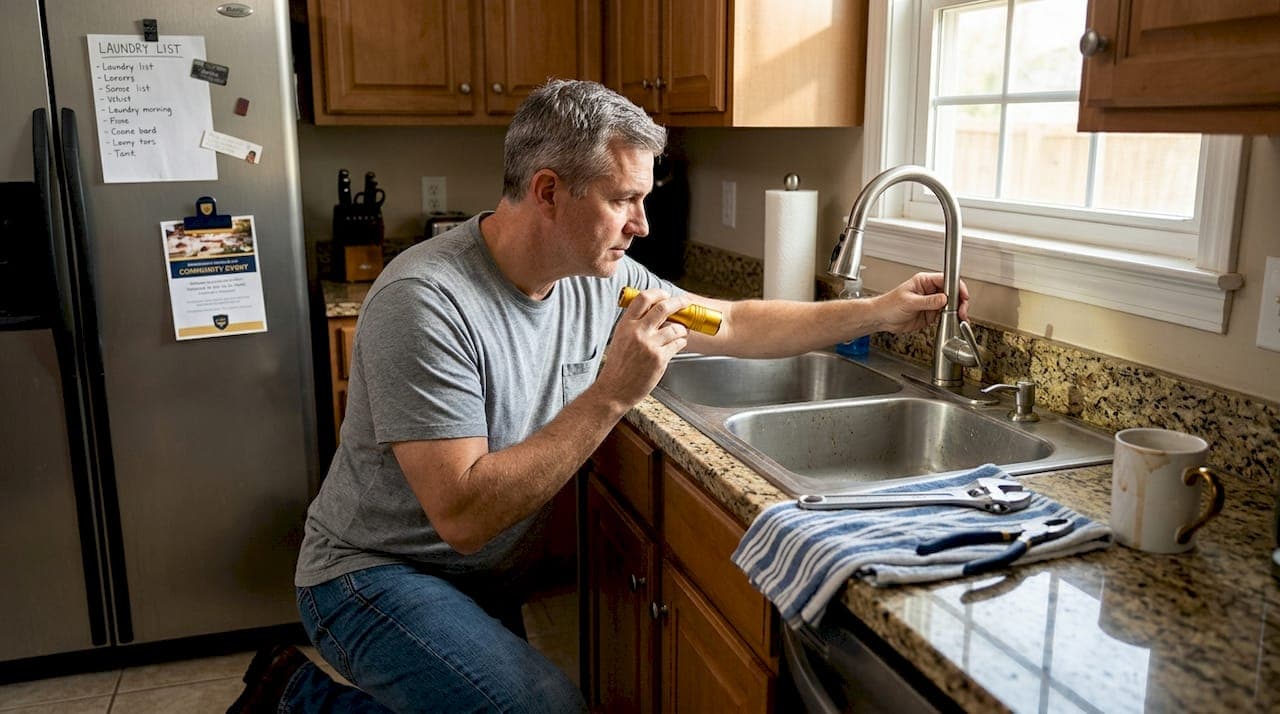
- Flashlight to see inside the cabinet under the sink
Before you buy anything, identify your faucet type. Compression faucets are the most common in older Middle Georgia homes and are the easiest to repair. They use a rubber washer that presses against a valve seat to stop water flow. When that washer wears out, water gets through even when the handle is closed. According to best DIY practice, the practical method for compression faucets is to replace the washer and related seals such as O-rings and packing, then inspect the valve seat for corrosion or damage.
| Tool or part | Why you need it | Where to get it |
|---|---|---|
| Adjustable wrench | Loosens packing nuts | Hardware store |
| Replacement washers | Fixes the main drip source | Hardware store |
| O-rings | Seals stem against housing | Hardware store |
| Plumber's grease | Extends seal life | Hardware store |
| Seat wrench | Removes damaged valve seat | Hardware store |
Pro Tip: Take a photo of your faucet handle and stem before you disassemble anything. This gives you a reference point when you're putting it all back together and helps the hardware store clerk match the right replacement parts if you're unsure of the size.
The single most important step before anything else is shutting off the water supply. Look under your sink for the shut-off valves, one for hot and one for cold. Turn them clockwise until they stop. Then open the faucet to release any remaining pressure and let residual water drain out. If you can't find shut-off valves under the sink, turn off the main water supply to your house.
Step-by-step: Fixing your leaky faucet
With your toolbox ready, you're set to fix your faucet. Here's how to tackle the repair with confidence. The process is more straightforward than most people expect, and each step builds on the last.
Safety warning: Never skip shutting off the water supply before disassembling your faucet. Even a slow drip can become a full-on spray the moment you loosen the packing nut with water still flowing. Shut off both hot and cold supply valves completely before you touch anything.
Here's the full repair process from start to finish:
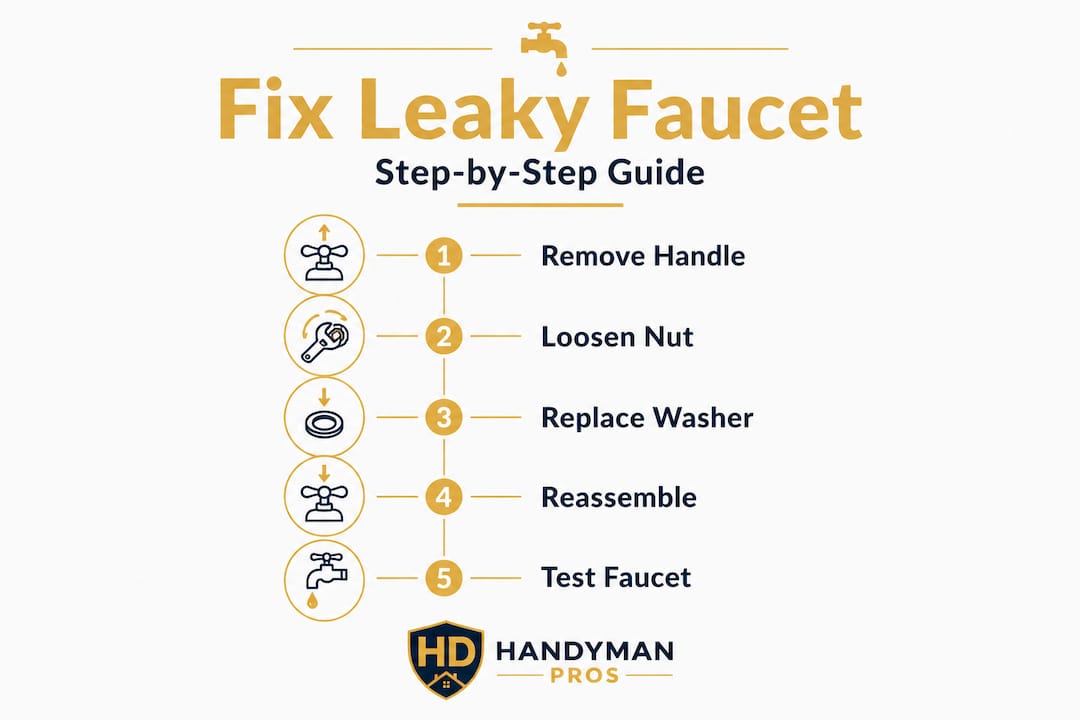
- Remove the handle. Pry off the decorative cap on top of the handle using a flathead screwdriver. Underneath you'll find a screw, usually Phillips head. Remove it and pull the handle straight up and off.
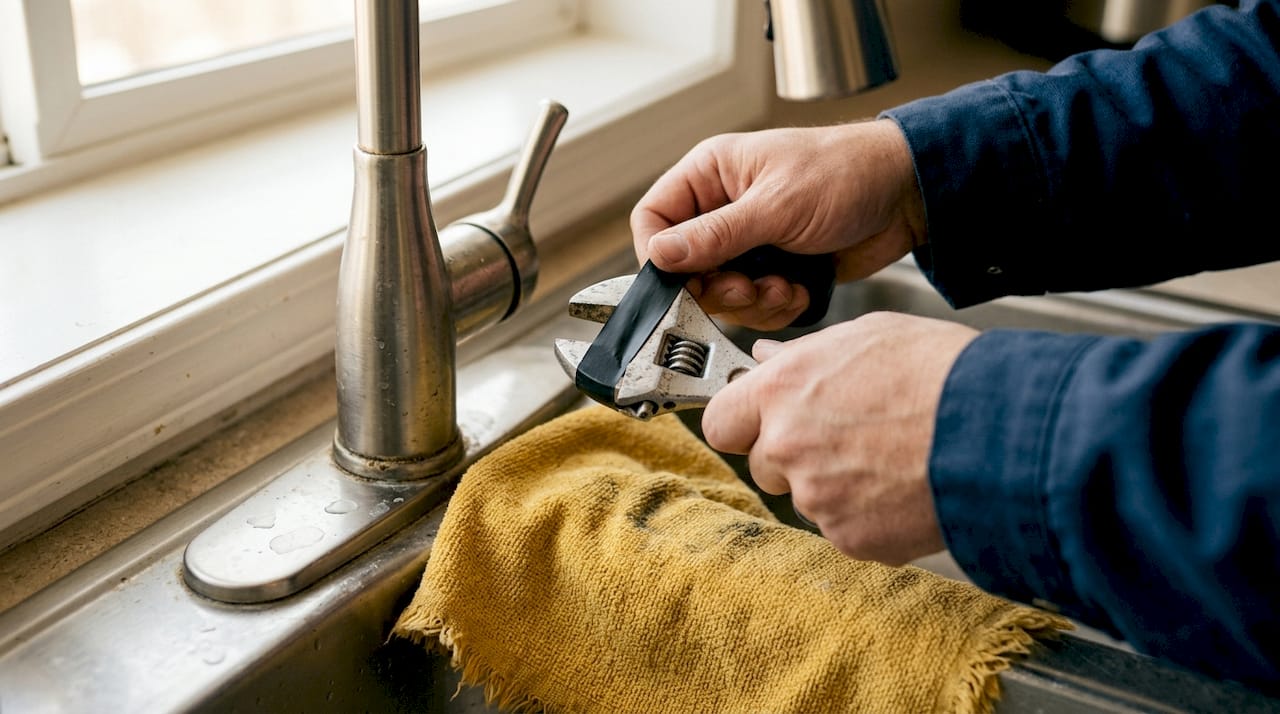
- Loosen the packing nut. Use your adjustable wrench to turn the packing nut counterclockwise. This is the large nut just below the handle base. Once loose, you can unscrew it by hand.
- Pull out the stem. The stem is the long threaded piece that controls water flow. Twist it counterclockwise as you pull upward and it will come free. Set it on a clean towel so you don't lose any small parts.
- Inspect and replace the washer. At the bottom of the stem, you'll see a rubber washer held in place by a brass screw. Remove the screw, pop out the old washer, and press in a new one that matches the size exactly. A washer that's even slightly too small will still leak.
- Replace the O-rings. Slide the old O-rings off the stem and roll new ones into place. Coat them lightly with plumber's grease before installation. This step is often skipped, which leads to leaks around the base of the handle rather than the spout.
- Check the valve seat. Look down into the faucet body where the stem was seated. The valve seat is the metal surface the washer presses against. After removing the stem, inspect for corrosion or mineral buildup, and replace the seat if it's damaged. A pitted or rough seat will destroy a new washer quickly.
- Reassemble in reverse order. Reinsert the stem, hand-tighten the packing nut, then snug it with the wrench. Reattach the handle and screw, then replace the decorative cap.
- Restore the water supply. Slowly open the shut-off valves under the sink. Turn them counterclockwise until fully open. Check for leaks around the handle base and at the spout.
| Step | Action | Expected result |
|---|---|---|
| 1 | Remove handle | Access to packing nut |
| 2 | Loosen packing nut | Stem becomes removable |
| 3 | Pull out stem | Washer and O-rings exposed |
| 4 | Replace washer | Main drip source eliminated |
| 5 | Replace O-rings | Base leaks prevented |
| 6 | Inspect valve seat | Confirms or rules out seat damage |
| 7 | Reassemble | Faucet restored to working order |
| 8 | Restore water supply | Leak test completed |
Pro Tip: Wrap your wrench jaws with a layer of electrical tape before gripping chrome or brushed nickel fixtures. This simple trick prevents scratches that would otherwise ruin the finish. Also, work over a light-colored towel so that small screws and washers are easy to spot if they fall.
Troubleshooting and common mistakes
Even a well-planned repair can hit a snag. Here's how to identify and solve the most common issues.
The most frustrating outcome is finishing the repair, turning the water back on, and watching the faucet still drip. Before you assume you did something wrong, work through this checklist:
- Wrong washer size: A washer that's even a fraction too small won't create a full seal. Match the old washer exactly, or bring the stem to the hardware store and ask for a direct match.
- Forgotten O-ring replacement: Many DIYers replace the washer but skip the O-rings. If you see water seeping around the handle base rather than the spout, the O-rings are the likely cause.
- Damaged valve seat: A damaged seat causes continued drips even after you've put in a brand-new washer. The rough or pitted surface tears through new rubber quickly. You'll need a seat wrench to remove and replace it.
- Stripped screws: If the brass screw holding the washer in place is stripped, the washer won't stay secure. Replace the screw at the same time you replace the washer.
- Over-tightened packing nut: Cranking the packing nut too tight can make the handle stiff and difficult to turn. Snug is enough. You don't need to apply maximum force.
- Improper reassembly order: If you put the stem back in before the packing nut is in position, you'll have to start over. Follow the steps in order every time.
Important: If you notice the faucet body itself is cracked, or if water is coming from inside the wall rather than the fixture, stop the repair immediately and call a licensed plumber. These are signs of a bigger problem that goes beyond a simple washer swap.
Pro Tip: Before you put everything back together, lay all the parts out on your towel in the exact order you removed them. This left-to-right lineup acts as a visual checklist and makes reassembly much faster and more accurate.
Testing your repair and knowing when to call for help
After the repair, it's important to confirm your faucet is fixed and to know your limits as a DIY plumber. A repair isn't complete until you've tested it properly and confirmed the leak is gone.
Here's how to test your work:
- Restore water slowly. Open the shut-off valves gradually rather than all at once. A sudden surge of pressure can dislodge a freshly seated washer before it has time to settle.
- Watch the spout for 60 seconds. With the handle in the closed position, observe the spout closely. A single drip within the first minute means the washer isn't sealing correctly.
- Check around the handle base. Run your finger around the base of the handle while the water is on. Any moisture there points to an O-ring issue.
- Test both hot and cold. If your faucet has separate handles, test each one independently. A leak on only one side tells you exactly which stem needs attention.
- Check under the sink. Look at the supply line connections and the shut-off valves themselves. Sometimes tightening the valves disturbs old connections that were already on the verge of leaking.
Pro Tip: Keep a simple note in your phone or a sticky note inside the cabinet door with the date of the repair, the washer size you used, and the faucet model. The next time you need to fix it, you'll have the exact part information ready without guessing.
When should you call a professional? If you've replaced the washer, O-rings, and valve seat and the faucet still drips, there may be a crack in the faucet body or a problem with the water pressure itself. Also, inspect the valve seat carefully after any persistent drip, since a damaged seat is the most common reason repairs fail. If the seat looks fine and the drip continues, it's time to bring in a pro.
The real DIY truth: Why most leaks are easier to fix than you think
Here's something we've seen over and over in our years of home service work in Middle Georgia: homeowners call us for faucet repairs that they absolutely could have handled themselves. Not because they lacked the skills, but because they assumed the job was complicated. That assumption costs real money.
The truth is that the vast majority of leaky faucets, probably 80% or more of the calls we get, trace back to one of three things: a worn washer, a cracked O-ring, or a corroded valve seat. That's it. These are $2 parts available at any hardware store in Macon or Warner Robins. The repair itself takes less time than the drive to pick up the parts.
What holds most homeowners back isn't ability. It's confidence. People worry they'll make things worse, strip a screw, or flood the bathroom. Those outcomes are possible, but they're rare, and they almost always happen when someone rushes or skips a step. If you follow the process carefully and shut off the water before you do anything else, the risk is genuinely low.
That said, we'll always be honest with you: some jobs do need a professional. If your pipes are old galvanized steel, if you're seeing water damage inside the wall, or if the faucet body itself is cracked, those situations call for someone with the right tools and experience. Knowing where that line is, and being honest with yourself about it, is actually the mark of a smart DIYer. Fix what you can. Call for help when it makes sense.
Need a hand? Middle Georgia's trusted handyman is here
Sometimes the repair goes smoothly and you feel great about it. Other times you open up the faucet and find something unexpected, a cracked body, a seat that won't budge, or pipes that are older than you thought. That's when having a reliable local pro on speed dial makes all the difference.

At HD Handyman Pros, we handle exactly these situations for homeowners and businesses across Middle Georgia every week. Whether you need a quick faucet fix or a more involved plumbing repair, our team brings the tools, experience, and local knowledge to get it done right the first time. Check out our full range of Middle Georgia handyman services and reach out whenever you need a hand. We're based right here in Macon and ready to help.
Frequently asked questions
Why is my faucet still leaking after replacing the washer?
If your faucet still leaks after replacing the washer, the valve seat is likely corroded or damaged. A damaged seat causes drips to continue even with a brand-new washer in place, so inspect or replace the seat before reassembling.
What types of faucets does this repair cover?
This guide focuses on compression faucets, which are common in older homes and straightforward to fix. The DIY method for compression faucets involves replacing the washer and O-rings with basic hand tools.
Do I need to turn off the water to my whole house?
Usually not. Look for the individual shut-off valves under your sink and close those before starting. Only shut off the main supply if your sink doesn't have its own valves.
Can a leaky faucet increase my water bill?
Yes, even a slow drip wastes thousands of gallons per year, which adds up to a noticeable increase on your monthly utility bill over time.